BioStyle Filter Setup and Installation Guide
The BioStyle Power Filter is a hang-on-back filter, meaning no hoses, no cabinet space, and no complicated plumbing. Just hang it on your tank and go. This guide walks you through every step of setup for the BioStyle 20, 30, and 50, from unboxing to first startup, and covers simple troubleshooting solutions along the way. Most users are up and running in minutes.
What’s in the BioStyle Box
Aquarium filter, multi-stage filter cartridges, biological filter foams with reusable frames, telescopic intake with inlet strainer, outlet stopper (non-thermo models only), and 6 ft. power cable. The outlet stopper lets you pause water outflow during water changes without unplugging the filter. Also included with the Thermo models are suction cups for the heater; the heater can be removed and used in the tank; only available in 30/50 models.
The number of filter cartridges and foams varies by model: the BioStyle 50 includes three multi-stage filter cartridges and three biological filter foams; the BioStyle 30 includes two of each, and the BioStyle 20 includes one of each.
Before You Begin: Pre-Setup Checklist for the BioStyle
Remove the plastic wrap from all cartridges and thoroughly rinse all filter materials with cold water before the first use.
IMPORTANT: Do not open the multi-stage filter cartridges.
Slide cartridges and foam back into the filter as pictured in the manual.
Ensure that the telescopic intake is seated properly in the filter unit.
Check your water level.
IMPORTANT: Do not let the water level drop more than 5.5 inches from the aquarium rim, to ensure the pump draws in water safely.
TIP: Low water level is one of the most common reasons the BioStyle won't prime. Top off your tank before starting.
Hanging the BioStyle Filter on Your Aquarium
Position the BioStyle on the tank, so it hangs vertically on the rim.
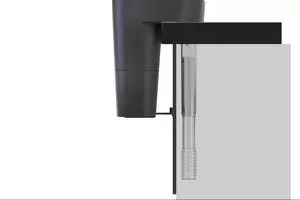
Adjust the blue leveler foot by gently pinching and pulling it away from the filter unit and toward the tank to stabilize the filter against the aquarium wall. See image below. When properly adjusted, the filter should sit flush against the glass with no rocking or wobbling.
IMPORTANT: A filter that isn't perfectly vertical can cause noise and reduced flow.
Note: The filter is compatible with both rimmed and rimless aquariums as long as the glass thickness is less than 1 inch.
How to Position the Telescopic Intake
TIP: Keep the telescopic intake 2-3 inches above the substrate (e.g., sand) to prevent fine substrate material from entering the filter. This is essential for planted tanks and sand-bottom setups. For added protection, intake sponges are available via Customer Service.
How to Prime the BioStyle Filter
Prime the filter by pouring tank or filtered water (not tap water) directly into the filter housing until it reaches the top of the cartridges.
TIP: Turn the blue flow control knob on the clear intake tube so the + symbol lines up with the arrow to ensure proper priming during initial setup.
Plug in the filter. If air is trapped in the intake, it may take up to 3 minutes to purge. The filter pump will begin delivering water once it’s done. It’s normal to hear a gurgling sound while the air is clearing.
I️MPORTANT: Never run the BioStyle without water, even briefly. Running it dry will damage the impeller.
I️MPORTANT: For Thermo models, plug in the filter first and confirm water is flowing before plugging in the heater. Never plug in the heater before the filter is running.
TIP: Lay the power cord, so a drip loop forms with the lowest point below the socket to prevent dripping water from entering the outlet.
Adjusting the Flow Rate
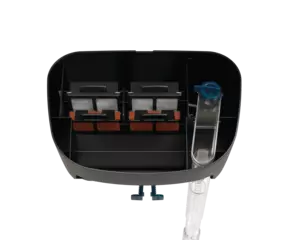
The built-in adjustable flow control is located under the lid on the intake (see image below). Turn it toward + to increase flow and – to decrease it. Lower flow is recommended for shrimp tanks, nano tanks, and planted tanks with delicate species; higher flow is recommended for heavily stocked tanks or those needing more surface agitation. If you’re unsure, start at the midpoint and adjust based on how your fish and plants respond over the first 24–48 hours.
Frequently Asked Questions
Troubleshooting Your Oase BioStyle Filter
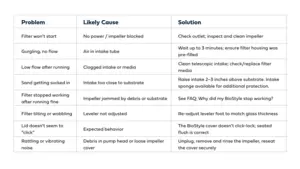
If your BioStyle filter is still not running or priming, check out this troubleshooting video.
Good to Know Tips
If setting up a new tank, consider squeezing an established sponge or adding bottled bacteria near the intake on day one, so the biological foam has time to colonize.
If treating fish with medication, remove the carbon cartridge during treatment. Carbon absorbs the medication before it can work.
Replacement filter media is available on our website.
TIP: Bookmark the spare parts page before you need it. Replacement cartridges, impellers, and intake tubes are all available separately. BioStyle filters are supported by a 3-year warranty.
What's Next?
Your BioStyle is up and running. Nice work. Here are a few resources from our Guides section to help you take the next step:
Cycling Your Aquarium: Before adding fish, learn how to establish the beneficial bacteria your tank needs to stay balanced.
Routine Aquarium Care: A simple maintenance schedule to keep your water clean and your fish healthy.
Fish & Plants: Tips for choosing the right inhabitants and plants for your aquarium setup.
Ready to explore more? Visit our full Guides library for guides on additional equipment, water care, and more.